Screen Recording Feels Flat? Add Camera Feel to Your Product Demo
When a product screen recording feels too flat, add 3D camera motion to a few key moments. It is not a flashy effect. It is a practical way to guide attention in a product demo.
Most product screen recordings have the same problem: they are clear, but they feel dead. The cursor moves, the viewer follows, and the whole thing starts to look like an old tutorial video.
Adding a little 3D camera motion to a few key moments can change the feel of the whole demo. This is not about showing off an effect. It is about controlling attention: where viewers look, when they look there, and where the shot finally lands.
Here is the difference in plain sight. Without 3D, the camera movement is flat and clear. With 3D, the same kind of movement gets a small tilt, so the important area feels more like it is being revealed by a camera.
Why not do this in a pro editor?
Honestly, doing 3D rotation in After Effects or Premiere is a lot of work for a product demo. You deal with 3D layers, camera settings, and keyframes. Then the product changes, the angle needs a tiny adjustment, and the rest of the motion starts needing cleanup too.
ScreenSage simplifies that logic. You do not need to think about axes or build the shot frame by frame. Drag in the preview, find the rough direction, then fine-tune only when needed.
The core idea: set the head and tail
The core interaction is the dual preview. Set two states:
- Start: where the shot begins.
- End: where the shot lands.
The system calculates the path between them. Your job is to judge whether the start connects cleanly and whether the end lands on the thing viewers should see.
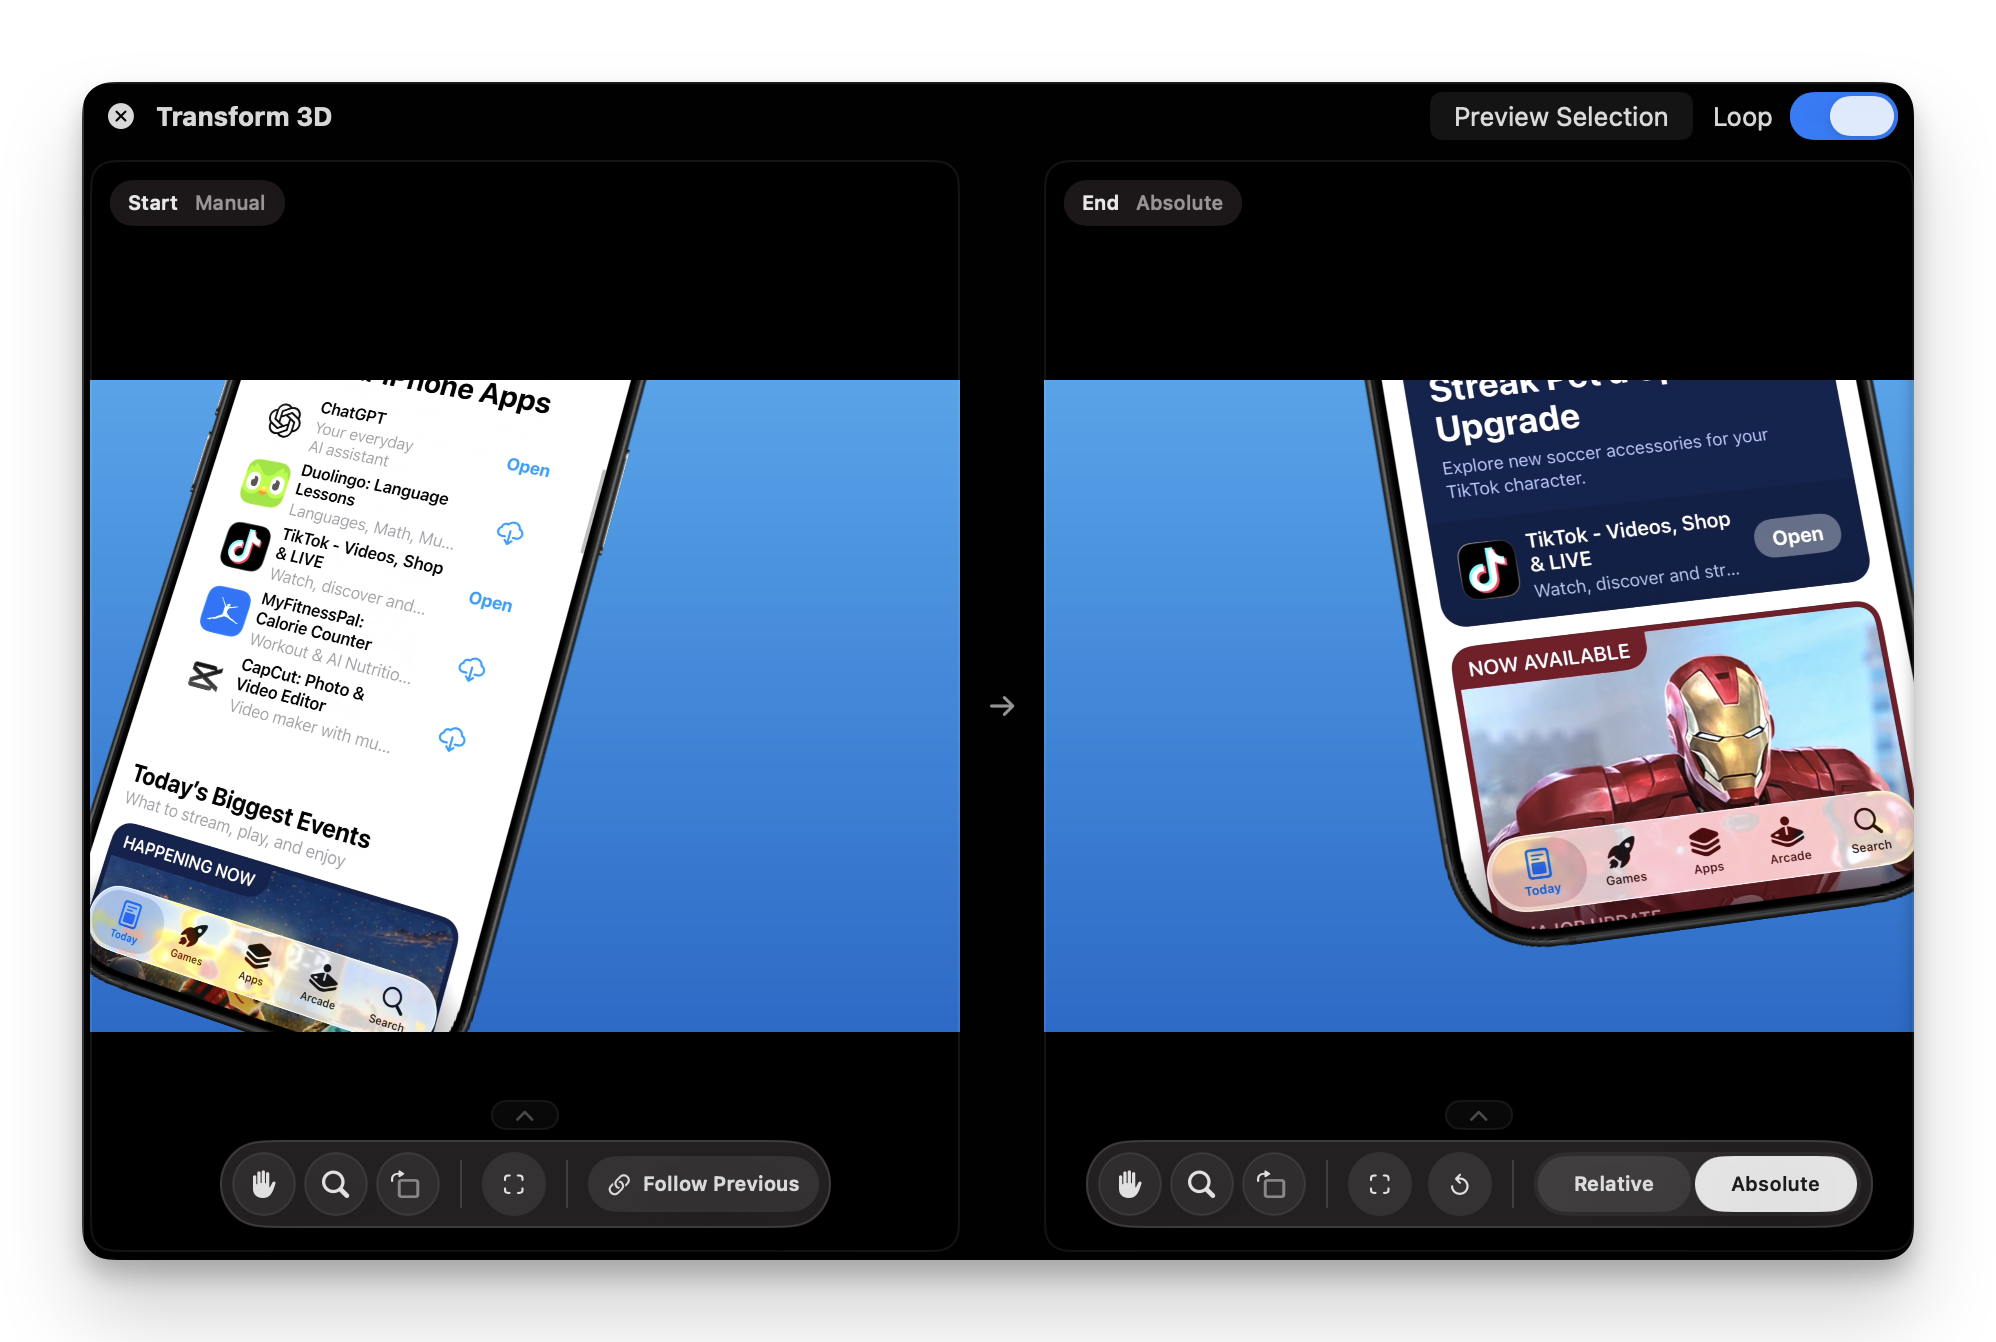
One detail matters a lot: Relative versus Absolute motion.
Use Relative motion when the End should move with the Start. For example, if you want the shot to always drift right, Relative saves you from fixing the same offset again and again.
Use Absolute motion when the final frame must land on a specific button, panel, or result area. The Start can change, but the End should stay locked to that final composition.
When unsure, start with Relative. It usually feels more natural for continuous product-demo motion.
When should you use 3D?
Do not put 3D motion on the whole video. Viewers will get tired quickly. A better rule is: use auto zoom for clarity, use 3D for highlight moments.
- Opening shot: a small angled push-in can make the interface feel more intentional than a flat screen.
- Waiting for a result: after clicking Generate, let the camera slowly move toward the result area.
- Moving between modules: a light sweep can help viewers understand the product space.
- Showing completion: when a result, export, or save action finishes, a small push-in tells viewers this is the moment that matters.
If the clip only needs to show a click, menu item, or small line of text, do not force 3D. A screen recorder with auto zoom will usually do a better job.
You usually do not need new footage
This part is easy to overthink: most of the time, you do not need to record again.
Use the existing recording if it is clear, complete, high resolution enough, and free of private information. Record again only when:
- The steps are wrong.
- The result never appears.
- Cursor movement is messy.
- The footage is blurry.
- The result appears with no hold time.
If you do record again, keep it boring on purpose: real UI, clean resolution, simple cursor movement, and a 1-2 second hold after the key result. Add the camera feel later.
A few mistakes to avoid
First, do not over-rotate. A small angle already adds depth. Too much rotation makes UI text stretch and quickly feels cheap.
Second, leave hold time. After the motion ends, keep the frame still for 1-2 seconds so viewers can actually read what the shot points at.
Third, do not let captions, cursor movement, and 3D motion all compete at once. When the whole screen is moving, the rest of the elements should stay calmer.
Fourth, judge the motion before tuning numbers. Get the direction right in the preview, then adjust duration, curve, scale, and angle.
My usual workflow
For a real product demo, I would do it in this order:
- Edit the screen recording until the story is clear.
- Use auto zoom for clicks, typing, menus, and small UI.
- Pick a few highlight moments: opening, generated result, module change, export complete.
- Add 3D camera motion only to those moments.
- Drag in the preview to find the direction.
- Check Start and End to make sure the shot lands in the right place.
- Tune duration and curve so the motion does not feel rushed.
3D motion is not better when there is more of it. Treat it like seasoning: a little in the right place makes the whole demo better; too much ruins the dish.
Final thought
ScreenSage did not build 3D camera motion so product teams could make movie effects. It is for product managers, founders, and marketers who do not have an editor on standby but still want a demo that feels a little more expensive.
Good product demos are not about being flashy. They are about holding the viewer's attention. Keep the clear parts clear, add camera feel where it matters, and stop there.
Auto zoom, cursor smoothing, text cursor follow, and fast export for Mac demos and tutorials.
Download ScreenSage Pro